Friday Challenges – Seeing Double & Back to School

Since last week’s post was so much fun, I decided to post a couple more Friday Challenges.  We will get back to lessons next week.

Managing Multiples
For the next Friday Challenge Steve Caplin posted this:

“Welcome to the 500th Friday Challenge! When I started this series back in 2004 I thought of it as most likely a one-off that, with luck, might keep people’s attention for a couple of weeks. And here we are, nearly 10 years later, able to look back on a vast body of outstanding work.

I’ve given a lot of thought to how to celebrate this momentous anniversary. Rather than setting a standard challenge, or even one of the compilation exercises that have marked previous centenaries, I thought that since, above all, you are the stars of this section, then you really should be the stars of this special edition.

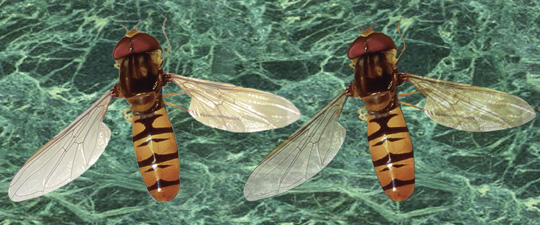
You may remember that a few months ago I posted this image, photographed by the man who cuts my hair and featuring his father: barberdadIt’s an outstanding piece of work. Not only does his Dad feature as every single character in the image, there are several changes of clothes and – this is the best part – there’s a lot of apparent interaction going on here between all the participants.

So for this 500th Friday Challenge, I’d like to see you feature yourself in a similar montage. Position yourself in as many poses and changes of clothes as you can manage, placed at various locations in a scene. I know some of you are camera shy, so if you really can’t bear to appear, you may choose to portray a family member or friend instead.

Remember, interaction is the key here. Show me what you’ve got!”

I don’t have an abundance of pictures of myself nor was I about to go out an take some. However, I knew my sister and brother-in-law took lots of photos so I decided to contact them.  They agreed to put in the effort culling photos, and taking more if needed, with the caveat that I use the product as a networking opportunity by starting a blog to showcase my Friday Challenges.

Sara Cheats Is Born
On the one hand, I knew I really did need to up my networking game. On the other, I’m uncomfortable “bragging” about myself. After further reassurance from my sister and brother-in-law that blogging doesn’t mean I’m braggart,  I decided to start Sara Cheats In Photoshop about my progress working through How to Cheat in Photoshop, 6th ed., by Steve Caplin. And, to my surprise, I’m enjoying myself.

In any case, I waded through my sibling’s standing-in-front-of-something-and-smiling photos until I found some that detailed a few of their traditional Christmas activities. Some activities were food-related. This gave me an idea. So I asked my sister and brother-in-law to take a picture of their kitchen, which I used as the backdrop.

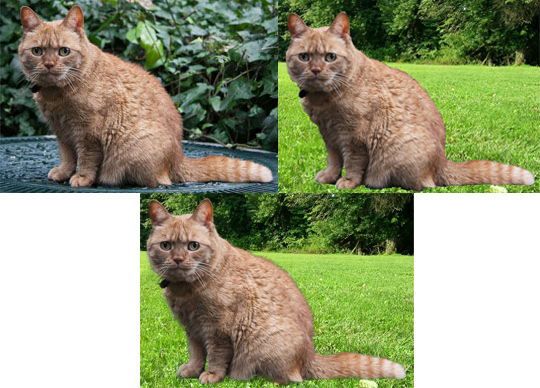
Below is my creation.  When I posted it to the How to Cheat forum (aka HotchiPs), I also issued a challenge as to which people were in the original image. Can you figure out who is original and who I Photoshopped in? (Forum members please don’t give this away.)KitchenScene11

Caplin’s critique and his guesses (not all which are correct!)

A personal challenge from srawland, as her kitchen scene features one original sister and brother-in-law, and three added-in extras. And it is hard to work out. I’d guess from the lighting that the one with the calendar is real – the tomato chopper looks convincing, …  As to the brother-in-law – the one at the back?

Post a comment and I’ll let you know if your guesses are right!

School Days
For the next Friday Challenge Caplin posted this image:EtonCaplin gave these instructions:

“As I was looking for a 501-themed idea for this week’s [501st] Challenge, I came upon the wartime 501 squadron of the Royal Air Force, and its Honorary Air Commodore Prince Henry, Duke of Gloucester. One of the images on his Wikipedia page shows him as a young schoolboy at Eton in 1914, dressed in the uniform of top hat and short coat.

Dressing like this today would lay young Henry open to public ridicule. Can you adapt the costume to make its wearer blend in better with modern fashion styles? You may wish to bear in mind that 501 is also a trademark of Levi’s jeans.”

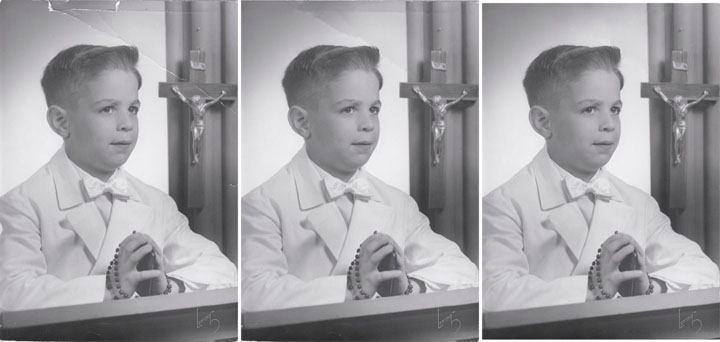
Coincidentally, I’d  just finished  Chapter 8, “Heads and Bodies,” in How to Cheat, where Caplin explains that swapping out heads is relatively easy compared to changing clothes. So, I didn’t even consider putting young Henry in a pair of jeans.  Instead, I came up with this: EtonModern4Caption: Much to the chagrin of his father, King George V, Prince Henry started hanging out with the wrong crowd.

Caplin’s critique:

“An excellent image from srawland, with an electric guitar-playing Prince dressed in decidedly casual clothes. I like the new hat, and the hair that goes with it – a very good updating. Nice work.”

 Now, if changing bodies were only so easy to do in real life…

Next: Beyond the Basics: Composing the Scene

Friday Challenge – Madge Triumphs

Welcome back!  I know you’ve been waiting for this post because, let’s face it, Friday Challenges are way more fun than reviewing my progress through the book.   Although How to Cheat in Photoshop by Steve Caplin is very entertaining, creating something from scratch is much more interesting .

Madge Gets Her Way
On his How to Cheat in Photoshop online forum, Caplin eventually gives regular participants a nickname when he feels their work has improved enough to deserve one. The Friday Challenge entitled “Open the Pod Doors”  finally earned me a moniker: Pixel Perfectionist.

It also happened to be Caplin’s the 499th Friday Challenge, for which he posted this image:3Dcar

His instructions were:

One of the exhibits at last year’s 3D Print Show in London was a prototype of a futuristic car, in which it was claimed that 3D printing played a part – although I’m not quite sure how big a part. The car itself, though, is intriguing. How, exactly, would you get into such a car? How does the door mechanism work? And how hard will it be to take it out of the showroom and put it on a city street?

When I originally saw this Challenge I thought that there was no way I’d be able to open the door. So, I submitted this image, instead:StreetScene2To create the scene I used the Warp tool so the car  would be in perspective.  I also added a dark, stormy sky to dramatically reflect how Madge felt about her neighbors.

I’d planned to post just this image. However, another HotChiPs (How to Cheat in Photo Shop) forum member posted an image he had found of the real car, which showed how the door opened. Then, yet another member – who posted a closed-door image – posted  a new image where she opened the door.  So, I decided if she was willing to make a second try, then I would too.

For my second effort, I created a prequel to the first image:StreetScenePrequelTo get the man’s arm to appear to be holding onto the door I used Puppet Warp. For the woman,  I had to make her clothing  match the original image. I re-colored her dress and put yellow sweater in her hand. To make the sweater appear folded, I used the Liquify filter. Since this it was a prequel, I added a slightly less stormy sky to hint at Madge’s mood.

Here’s what Caplin had to say:

A very strong image from srawland, whose car is well integrated into a suburban street. I like the view of the woman inside the car, although it’s hard to see exactly what she’s doing – and the woman peering out of her front windows. Very nicely achieved. The second entry is splendid: a perfectly integrated scene. See – I knew you could do it! And it’s certainly good enough to earn you a much overdue title. Shall we say Pixel Perfectionist for your great attention to detail? Good work, Sara

I was so happy to receive my appellation that I didn’t bring up the deep ambivalence I felt surrounding being called a perfectionist.  If he knew the story, I’m sure he would have come up with a different title. But, all the same, I’m still pleased Caplin felt my efforts deserved bestowing a nickname.

Buoyed by my success, I decided to add a final image to complete the series. Now it’s all blue skies for Madge:StreetScene3

To give you an appreciation for the whole story, in the proper order, I created this graphic:StreetSceneWholeStory

Like Madge, hope all is well in your world too!

Next: Friday Challenges: Seeing Double & Back to School

Throwing Some Curves with Image Adjustments – Part 2

As we learned in the previous post, the final “basic skills” chapter in Steve Caplin’s  How to Cheat in Photoshop introduces key techniques extensively used in photomontage. Next, Caplin demonstrates that he expects his readers have systematically followed the book thus far.

Major Color Changes
This lesson uses both a Hue/Saturation adjustment and Curves adjustment to change a black Mini Cooper into a red one with a British flag on it’s roof, a la Michael Caine’s film The Italian Job.  It’s also the first lesson where How to Cheat in Photoshop leaves out specific instructions. For example, Caplin gives hints in the steps for creating the Union Jack, but leaves it up to the reader to know how to complete the task.  I’m sure people who expect an author to provide them with all the necessary lesson components were cursing Caplin, and perhaps even throwing his book against the wall, when they attempted Step 6 (see below). I grumbled a little, myself. Then I realized that, in real-world situation, Caplin most likely would not be there to tell me what to do.

Step 6 reads: “Now for the flag. The roof is selected from the red layer, and made into a new layer; then desaturated using the Command-Shift-U (Mac) or Control-Shift-U shortcut.”92-Major-color-changesExamples-1024x543

Note that Caplin says “the roof is selected” leaving it up to the reader to determine which selection technique to employ.  I chose to use the pen tool, as I am quite comfortable with it. (See blog post Pixel Perfectionist – Part 1; First Encounter: Photoshop 7). I also used the pen tool for Step 10 where he instructs: “The red portion of the flag is created by drawing it’s outlines, and then deleting that area from the white roof to reveal the read coloring that’s already beneath it.”

I did have one bone to pick with Caplin about this project. Step 11 discusses creating the license plate using a certain font most people are not likely to have on their computer, as well as a technique not covered until Chapter 10 – Metal, Wood and Stone.  I also had to go onto Google Images to find “GB” sticker image.  Actually, I didn’t complete this lesson until I reached the “Metal with Layer Styles” lesson in Chapter 10, at which point I also uploaded a similar font from the Internet. It seemed a bit unfair that Caplin didn’t supply layers with the license plate and the sticker to for this lesson in Chapter 4. Maybe he was just trying to weed out the wanna be photomontagists from the serious students. But I digress…

Selective Hue and Saturation
Sometimes an image is almost perfect except for one element being a little too bright or dull.  Such as in the case of the original of the image below:OS20069

It’s been possible to select a broad range of colors using the Hue/Saturation adjustment in many previous versions of Photoshop.  However, starting with CS4, it’s been possible to click and drag directly on an image to change only selected colors.  This is demonstrated in the “after” image, where the technique enabled lowering the red saturation in the boxer’s gloves and robe without drastically affecting his skin tones.  His shorts were also re-colorized to more closely match the new robe and gloves.

Natural Healing
Back in the post Just Thumbing Through I hinted at the power of the Healing Brush. In this chapter I learned the basics and a solution to a common problem.  The Healing Brush works by using the texture of the source area and then blending that with the lighting of the target area.  This works just fine if the target area only contains pixels of a similar hue and saturation. However, when there is a sharp difference, the Healing Brush produces an unsightly bleed as it tries to combine the pixels. My CS3 course did not address this shortcoming.  However, How to Cheat in Photoshop does.

In the example below the model had her blemishes removed by sampling a clear spot on her forehead and painting over the blemishes. This works well for all blemishes except the mole on her right cheek. In the middle image, notice how that “fixed” area includes white bleeding through from the background:100-Natural-HealingExample-1024x530

Caplin provides an excellent solution:  select that area of the face, subtract the white background and then apply the Healing Brush.  The image on the right shows the result.

As you can see, this chapter taught me a lot. I’ve used all of the techniques in Chapter 4 to complete subsequent lessons and the Friday Challenges. Speaking of which, stay tuned for more Challenge fun next week!

Next: Friday Challenge – Madge Triumphs

Throwing Some Curves with Image Adjustments – Part 1

Although it’s the last “basic skills” chapter in How to Cheat in Photoshop by Steve Caplin, “Chapter 4 – Image Adjustment” introduces some key techniques are used extensively in photosynthesis. I learned so many new skills in this chapter that I’m splitting it into two blog posts to cover them all.

Shadow/Highlight
Another example of a technique that was available in CS3, but not covered in my CS3 class, is the Shadow/Highlight Adjustment dialog box. It can be found under Image>Adjustments. Below, I only used the default setting to considerably brighten the background without washing out the statue:86-Shadows-Highlights-1Example-1024x462

However, images often need further adjusting, such as in the next series. In the original image the sky was so bright that the camera compensated by making the rest of the image too dark to keep the sky from washing out. In the second image, the default Shadow/Highlight Adjustment setting lightened the other elements but not quite enough. For the third image, the picture is greatly improved by increasing the amount and tonal width:86-Shadows-Highlights-2-Example-1024x650

Now let’s consider the opposite problem. In the original image, below, the woman’s face is fine but her white coat is too bright and looks washed out.  The default settings take care of the coat but also darkens the woman’s face too much. Finally, reducing the tonal width in the Highlight section a balance between skin tones and coat can be achieved and the picture vastly improved:86-Shadows-Highlights-3Example-1024x653Throwing Some Curves
A far more powerful tool is Curves. This is yet another tool that was not covered in my CS3 course even though it was available all along. Curves are tricky to master and I’d wanted to learn to do so ever I saw an Adobe demonstration video on the technique in the spring of 2011. I purchased How to Cheat, in part because I could see Caplin covered Curves extensively. If you don’t know how to use Curves, it’s worth purchasing the book to learn this technique alone.

One attribute of Curves, unlike the Shadow/Highlight Adjustment, is that the technique can be used as a Layer Mask. This means that the original pixels are not changed or lost. If necessary the original image can be recovered.While HotChiPs (How to Cheat in Photoshop) devotes two tutorials to Curves in Chapter 4, almost all the following lessons use Curves as one of the steps. The first tutorial demonstrates how, in nine steps, Curves can be used to take a dull image and make it into a bright one. Here is the original and the result:88-CurvesExample

The second tutorial demonstrates how the Curves technique can be used on a problem that commonly occurs when combining two or more separate images: Variations in tone and color cause the completed image to look like it was composed of separate elements. Here’s an example. In the original image on the left, the man’s hand is the correct size for his face. But, the face and hand clearly don’t belong to the same body. The right-hand image demonstrates how to use Curves in five steps to change the tone, contrast and brightness of  the hand to make it more closely match the man’s face:That’s enough of Chapter 4 for now. Tune in next week when a drab Mini Cooper gets a flashy 90-Matching-colors-with-CurvesExapmlesnewmulticolor paint job!Next: Throwing Some Curves with Image Adjustments – Part II

Hiding and Showing

Of the first 4 chapters in How to Cheat in Photoshop  6th ed., by Steve Caplin Chapter 3: Hiding and Showing has by far been the most useful to me.

The chapter covers two very important technique: Clipping Masks and Layer Masks. Every one of my Friday Challenge submissions required at least one, if not both, of these techniques. Plus, most of the future lessons in How to Cheat in Photoshop also require mastery of these skills.

While my CS3 class did include a lesson covering both Clipping Masks and Layer Masks, neither of these techniques was touched on again. So, I didn’t understand the usefulness of them until I started working through Caplin’s book. However, now that I do understand them, Masks are near the top of the usefulness scale for all the skills I’ve learned thus far. That and Curves, which I’ll discus in a later post.

Well Suited
Caplin only has one tutorial on Clipping Masks, which he combined with a demonstration on layer modes. When I ran through this lesson, I did not immediately see the utility of it. That would come with later chapters when Clipping Masks are used extensively.  The two images below cover the gist of the lesson.

 
The lesson started out with a gentleman and an image of what looks to be Victorian era wall paper:Clipping Mask Original
The instructions are simple enough: Create a clipping mask. Below are the results with the wallpaper layer changed to various modes.  Some actually look like they could possibly be worn by a man, although I’m not sure in what situation it would be appropriate.Clipping Mask - with Layer Modes

Unlinking a Layer Mask
As mentioned, my CS3 course covered layer masks, but it never discussed unlinking one. Being able to move an object behind a mask is very useful when creating a photomontage. In fact, I’ve used the unlinking technique in every Friday Challenge so far.

Here is Caplin’s example:Original Layer Masks 1

 
Now, let’s say you’ve been given the assignment to put the man behind the desk for a corporate brochure. Here’s how it looks with the basic Masks technique:Layer Masks 1EditedOriginal
This is as far as my CS3 class went. I know because I went back and checked the book.

But now let’s say your boss (or client) wants the man to stand between the desk and the chair. With the basic Masks techniques, moving the man would move the desk as well.

As Caplin teaches, click on the chain icon in the layers panel to remove the link as follows:Unlink Mask
With the link removed the man can be moved and the desk stays put. The man can be move behind the desk as long as that desk section was masked. Otherwise he would just pop out in front of the desk again.Layer Masks 1Edited

A Soft Touch for More Realism
There’s even more I learned about Layer Masks from Caplin’s book. For example, while most layer masks are created with brushes, it turns out any of the painting tools can create a mask in order to make the image look more realistic.

Consider this original image:Layer Masks 2 Original

Note in the layers panel, the image is composed of three separate elements: a “people” layer, a “sky” layer and a “grass” layer.  Notice how it looks like the people are floating above the grass. Also, the sky and the grass come together along an unnaturally hard, straight line.

 
Layer masks can be used to fix it like this:Layer Masks 2 Completed

First, the sky was masked using a gradient, making the horizon line look more realistic. Also, an inverted mask, that has been streaked with the smudge tool to simulate blades of grass, has been applied to the people to give the appearance of being on the ground rather than hovering above.  Finally, a new layer was added to create a shadow under the people.  Note how the couple now look as if they really are lying in the field. Why they are doing so is still a mystery.

Masking Using Color Ranges
My CS3 course can’t be faulted for not covering color-based masking as Adobe didn’t introduce the technique until CS4.  Like the background eraser tool, a range of colors can be selected to be removed from the image. But the big difference is that nothing is permanently erased. It is only hidden.
Take this image:Layer Masks 4 Original
What if you want to give it a more dramatic background? No problem. Using a mask and the masks panel, you can select the color range for the blue sky and that area will be masked. This allows for adding the desired background:
Now that’s dramatic!Layer Masks 4EditedMtFuji

Blending in Some Fire Power
The final technique I’m going to discuss from  How to Cheat in Photoshop, is blending. This really isn’t a mask. But it does fit in with this blog’s theme of hiding and showing.

Take this original image:Blending options 1Original

It consists of three elements: The hand holding the gun, a picture of lit fireworks that has been rotated on its side and a background that looks like a library. Caplin wrote that whenever he thinks of gunshots, libraries come to mind. I concur. If a firearm must be discharged indoors, it should be in the library.

However, to make this scene look real, the black box around the fireworks needs to be removed.  It could be removed using one of the previous Masks techniques. But, there is another way. By using the Blending Options dialog box, under Layers>Layer Style, nothing gets erased, it just gets hidden. This technique definitely wasn’t covered in my CS3 course despite the capability being there all along.

Here is the image after adjusting the Blending Options:Blending options 1Edited

Now it’s ready to insert into that Who Done It? story you’ve always dreamed you’d write!

Next: Throwing Some Curves with Image Adjustment

Friday Challenge – Mouseton Abbey

Prior to starting this blog, I previewed this challenge to a few folks and received resounding accolades. Please do leave comments if it strikes a cord with you, too!

Caplin entitled this Friday Challenge “Anthorp that mouse” and explained as follows:

“I took my first ever evening class, as a student, this week: Anthropomorphic Mouse Taxidermy. Each of us was given a dead mouse, and over the course of the next four hours we were taught how to skin it, clean it, preserve it, stuff it and mount it.

The ‘anthropomorphic’ part of the title refers to the fact that the trainer brought along a whole range of doll’s house props – hats, rakes, chairs, benches, clocks and so on – which we were encouraged to attach to our completed beasts.

I just couldn’t decide, so I opted to leave my mouse more or less au naturel, rearing up in a pouncing pose. Can you complete the task, and give the rodent some more human qualities?”

He gave us four different angles and I chose this one:mouse3Blog

Of course I used some of my newly learned skills from How to Cheat in Photoshop 6th ed. for this submission. However, I do have to admit the text, and the black banner it sits on, were skills I learned previously in my CS3 class.

Having just finished a Downton Abbey marathon on DVD, I came up with this:MousetonAbbeyBlog

I didn’t like the way the mouse’s teeth stuck out in the original image so I closed it’s mouth using the Liquify Filter.  I only used that modified head one time, it’s the second in from the right. For the others, I decided I didn’t like the way the eyes were set. So, I used the Liquify Filter again to make the other mice heads. Oh, I did go back and correct my spelling error and put Caplin’s recommended shadows under their hats.

Caplin’s Critique:

“A very neatly constructed Mouseton Abbey from srawland, neatly replacing the cast of Downton. And very aristocratic they look, too! Some shadows under the hats would help them to look more in place, though – and do watch your spelling of “Abbey”!”

I hope you’ve enjoyed this series of Friday Challenges. I certainly enjoyed coming up with the material! Stay tuned for more, including some with actual story lines.

Next: Hiding and Showing

Friday Challenges – The Problem of Fur

fter my early successes, I was starting to look forward to Friday Challenges. Then came “In the Wild.” It turned out to be quite a learning experience for me, but only because I was dissatisfied with my entry.

Here is Caplin’s original image:elephantStatueBlog

His instructions were:

“I photographed this remarkable statue of an elephant outside the Musée d’Orsay in Paris. It’s beautifully detailed: tied to a lump of masonry, it’s being molested by a monkey. It’s a very realistic scene, apart from the fact that it’s all made of dull bronze and is on a pedestal in Paris. Can you return both these beasts to the wild, and make them real?”

Below is my second submission.  In the first one, I forgot to add the monkey.  In case you’re having difficulty seeing it, the monkey is on the stone wall in the background toward the left side of the image.Lodge BalconyCompleted3Blog

Caplin’s critique:

“A very fine image from srawland, with the elephant nestled into the jungle. I found the original of your background image with TinEye, and I like the added woman with binoculars – she draws the viewer’s eye neatly across the scene to the new elephant. Perhaps the monkey could have made an appearance on the terrace? Aha – there it is in the second entry, although it is a little difficult to make out. And as for following my instructions – no-one else takes any notice either!”

I put the monkey so far back in the scene because I couldn’t figure out how to make it look more realistic.  By that time, I completed How to Cheat in Photoshop, 6th ed., through the middle of Chapter 8, but had not yet started on the two lessons about beards and stubble.  Once I completed them, I had a brainstorm.  Below are comparisons of modified versions of just the monkey.Baboon statureFurComparisonBlog

The monkey on the left is a simple cutout from the original image.  The center monkey is what I was able to create for “In the Wild.” Clearly, it’s not very realistic.  However, I created the monkey on the right using variations on the techniques discussed in the lessons covering beards and stubble. Granted this monkey wouldn’t fool anyone by itself. But, inserted in the appropriate background, it could pass for real.BaboonFurInBackground

Although I’m still working on my beard and stubble skills,Caplin responded:

“…[Y]our technique, Sara, is excellent: that’s a really good way of doing it.”

Next: Friday Challenge – Mouseton Abbey

Friday Challenges – The Fun Begins!

Steve Caplin might have stopped with the publication of his book, How to Cheat in Photoshop, and just gone back to freelancing. Or, he might have gone back to freelancing after setting up a Web site to advertise the book.

Instead, he chose to invite contact with his readers by setting up a forum. I am forever grateful he took this path.

Any time I am having difficulty with a lesson in the book, I can post a question to the forum. Most importantly, Caplin posts back within 48 hours. His answers and critiques are both illuminating and constructive, as befitting a top-notch Professor. The whole experience is much more like taking an online course than simply running through exercises in a book. I’m also grateful for “The Friday Challenge” feature of the forum. Every Friday Caplin posts a photo with very general instructions for what he wants done with it. This is very much like a real-world work experience than simply following directions in a book.

On the subsequent Friday, Caplin critiques all of the previous week’s submissions and, of course, posts a new Challenge. His critiques not only point out errors, but also provide the remedy. Caplin seems genuinely interested in helping people not only learn the craft of photo-montage, but also the art of it.

Enough talk. Let’s get on to the Challenges!

The Disused Railway
I began submitting Friday Challenges after I had completed Chapter 5, as I was working on my skill level and building confidence. That week’s challenge was entitled “The disused railway:” Disused-railwayOriginalBlog

Caplin’s instructions were:

“I’m indebted to Michael Sinclair for this week’s Challenge, which features a rather fine shot of a disused railway line.  As you can see, it’s now quite overgrown.

Michael didn’t feel the most was being made of this public resource. What could you do to liven it up? Turn it into a canal, perhaps? Or back into a railway? There must be some good use for a very long, rather narrow tract of land.”

There were many impressive entries. My simple entry used the Refine Edge technique, which I discussed in my “Natural Selection” post, around the feathers in the knight’s helmet and on the Disused-railwayWithKnightBloghorse’s tail. I also used a Gaussian Blur in a Quick Mask gradient, a technique in a Chapter 5 lesson:

Caplin’s critique:


A new member this week, and srawland has added a splendid knight on horseback hurtling towards us. A great cutout, and the tones match well with the scene. I think I’d have made him a fraction smaller and moved him back a little in the shot, so he blended in without dominating quite so much. Welcome to the forum, Sara!

A Night at the Opera

Caplin’s enthusiastic welcome definitely bolstered my confidence so I took on the next Challenge, “A night at the opera:operaOriginalBlog
Caplin’s instructions:


I went to the Royal Opera House, Covent Garden, this week to see a rather splendid production of Don Giovanni. Our seat were in the second row, with a view of the orchestra.Of course, I wasn’t allowed to film during the performance itself. Can you give me an idea of how it might have appeared once the curtain went up, the house lights went down and the conductor put in an appearance?”

My immediate idea was a “joke” entry. But, as a newbie, I felt I might be breaking some rule about poking fun at the opera.  At first, the other submissions were very serious indeed.  Finally, someone posted an entry that featured Bugs Bunny and Elmer Fudd. Emboldened, I posted this submission.  I noticed that other forum members gave their submissions captions so I entitled mine “How Children View Opera:”operaWithSheetMusicBlogI used a Layer Mask to place the cat’s heads on the Opera singers bodies. Unfortunately, after getting Caplin’s critique, I went back and changed my original Photoshop image and deleted the original .  I darkened the gold using a Curves Adjustment Layer and added the sheet music by using the stands as a clipping mask and Free Transform to get the correct angle.

Caplin’s critique:

“A clever and funny entry from srawland, with animal heads on the performers – and a neatly inserted conductor in the pit. You’ll soon realise that nothing is sacrosanct on this forum, Sara! A strong and entertaining entry – although I’d have, darkened the gold on the right to bring the house lights down.”

Rear Window

The next two Friday Challenges, while they did help me hone skills didn’t require any new ones so I am skipping them in this blog. Then Caplin posted a Friday Challenge entitled: “Rear window:”rearwindowOriginalBlog
Caplin’s instructions:

“This is the view from the window of our hotel room in Paris. It’s all quiet enough during the day, but of course it really comes to life at night…or does it? What sort of French farce might be played out against this backdrop?”

I was pressed for time due to minor surgery and a temporary position (now ended). Having previously managed to progress through Chapter 7 in How to Cheat in Photoshop, which covered changing a building scene from day to night, I created a scene with the party on the roof. I hadn’t decided to start this blog so I deleted that image after modifying it due to Caplin’s critique. In addition to moving the party’s location, I changed the placement of the figure holding his ears by switching it with the figure holding the broom, moved the bra from the roof.
Caplin’s critique:

“A very well lit entry from srawland, despite not having enough time for it – but those rush jobs are often the most compelling. I like the subtlety here: the man banging the broom on the floor, and the one clutching his head at the bottom, both suggest noisy goings-on in the apartment between them. I probably agree about the music. A good entry!”

My post-critique image:rearwindow2Blog
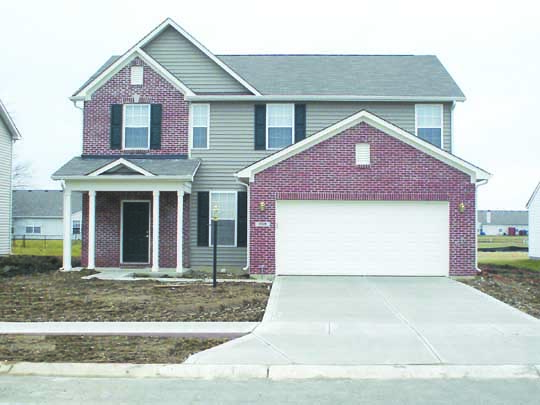
If I were to give this version a caption it would be: “The tenants at Crowne Royale Court always knew when the adults in apartment 3D were away for the weekend.”

Next: Friday Challenge – The Problem of Fur

Transformation and Distortion

is post is a little longer, but it’s photo-rich and a quick read. So, don’t be afraid to scroll down.

Chapter 2 of How to Cheat in Photoshop, 6th ed., by Steve Caplin is similar to Chapter 1 in its concentration on more “basic” techniques. But, like the previous chapter, there is also a surprising amount of new material. Most of the really new and interesting stuff is located under the Edit menu.

Free Transform and Image Warp
Almost every time two or more images are combined in Photoshop, at least one will need to have its perspective changed to make the composite look realistic. This can be achieved by using Free Transformation and Warp, both of which are found under the Edit menu and have been available since CS2. Free Transform allows for perspective changes on both horizontal and vertical axes. Warp (found under Edit-Transform-Warp) enables distorting an image in numerous ways, including creating the appearance of going around a curve.

For example, say you needed to add the poster image on the left to the three sigh boards on theater image on the rightTransformation in practiceOriginalAllSimply scaling the poster just doesn’t fit, especially around the curved side of the building for the middle sign board. And, you can’t put the poster on the right-hand signboard at all:Transformation in practicePostersUnrealistic
However, using Free Transform to scale the left and right posters while applying Warp to the middle poster yields a much more realistic result:56 - Transformation in practiceEdited
Further realism can be achieved by changing the mode of the layer from Normal to Overlay.

New in CS5: Content-Aware Scaling, Content-Aware Fill and the Ruler tool

Content-Aware Scaling
Let’s say you have a picture like this with some boring “blank” space in the middle:Content Aware ScalingOriginal
You need to add this picture to a publication, but space is limited. Simply cropping the edges causes the loss of interesting subject material. Previously, your only option was to crop out the middle, move the two ends together and spend hours hiding the join. Now, with Content-Aware Scaling, you just scooch the ends together without an unsightly join to remove:58 - Content Aware ScalingEdited

Content-Aware Fill
I have to admit I stumbled on to this new feature before encountering How to Cheat in Photoshop. However, because I tried to figure out how to use it on my own, I didn’t get a good understanding of this tool.

Content-Aware Fill has many useful applications for professional and home photography. For instance, you’re visiting an exotic tropical location and you want a picture of a pristine beach. So, you head out early in the morning to get the shot. But, darn it, someone is already there!beachOriginal
No sweat. Using CS5, just make a gross selection of the people using the Lasso tool then under the Edit menu go to fill and select Content-Aware in the dialog box and press OK. Presto-Chango! Now you’ve got the beach all to yourself!EmptybeachNote that with some types of photos you might also have to do a little work with the healing brush and the clone stamp tool, but at least Content-Aware Fill has done most of the grunt work for you.

The Ruler tool
Another addition to CS5 is the Ruler tool, which is located under the Eyedropper. It takes the guesswork out of straightening a crooked photo. And, combined with Content-Aware Fill can make even a skewed photo look professional. Here’s an example:

Oh dear, it looks like the ocean is going to pour right out of the picture!Content aware fillOceanViewFirst, use the Ruler tool to draw a line that matches the horizon and press Straighten:Content aware fillOceanViewStraightenandCroppedBut, with only the tiny bit of sky at the top, it looks as if a giant tsunami wave is about to crash down upon the viewer. YIKES!!

Fortunately, the Ruler tool is actually a two-step process. Undo just the last step. See how Photoshop tilted the picture to level the horizon as specified:Content aware fillOceanViewStraightened
Now, with the Magnetic Lasso tool draw just inside the perimeter of the image and inverse the selection to capture the white area. Then, select Content-Aware Fill and voila! Photoshop fills in the white area, and everyone stays safe and dry:62 - Content aware fill 2Edited
Also new in CS5: Puppet Warp

What a great innovation Puppet Wrap is. Often, an image would be just perfect if you could just move an arm, make it look like the subject is looking up, or even move the subject’s fingers. Now, you can do this without spending hours, or days, putting each element on separate layers, fiddling with Image Warp, joining everything back together and then trying to make it look seamless. What a nightmare!

Puppet Wrap is also located under the Edit menu. With it you can create life-like changes in an instant.  It works by creating a “mesh” in which you insert “pins.” The trick is inserting the pins at natural joints. Take this open hand:Front&back
Using the miracle of Puppet Warp, it’s closed:Front&back

Here’s another example. Say you wanted to make this rhea, a South American flightless bird similar to an ostrich, look as if it’s about to pluck some fruit off a tree.rhea
Simply place a pin at the base of the neck where it joins the body, a pin where the neck starts to curve up, one at the base of the skull and one at the tip of the beak. Now alternately drag the pins at the base of the skull and the beak until the rhea is looking up at the proper angle. Finally, place your rhea in the background and now you have a bird caught in the act of stealing some fruit:AppleTreeWithRhea

Natural Selection

This blog post chronicles my progress learning new Photoshop skills from the book How to Cheat in Photoshop, 6th ed., by Steve Caplin, and my Friday Challenge submissions to the Forum linked to the book.

Back to Portfolio Page

As explained in my post Pixel Perfectionist – Part 2“, I intended to dig into How to Cheat in Photoshop, 6th ed., by Steve Caplin when my temporary job at LGS Recreation ended December 2013. However, I didn’t get down to business until mid-January 2014. Sure, I had excuses like the Holidays and then a bought of Swine Flu. But my real reluctance was due to the first chapter covering selection techniques. After all, making selections is SO basic. I began to question all the great reviews I’d read before I bought the book.  Was I wrong! When I finally did buckle down, I discovered that How To Cheat in Photoshop offered a wealth of little tricks in every lesson. Here are three from Chapter 1.

Trick #1 – Black vs. Grey10 - QuickMask 2Flies

Both of these flies were selected and copied from a plain white background using my favorite selection technique: Quick Mask. On the left, I selected the fly using a traditional black, hard-edged brush.  On the right, I also used a black, hard-edged brush for the fly’s body, but the transparent wings were created by using a 60% grey brush, hard-edged, except for the veins in the wings. They were still selected using the black brush. Clearly, the right-hand fly looks much more realistic against the background. This technique was available way back in Photoshop 7, but neither of the books I learned from for Photoshop 7 or CS3 mentioned this trick.

Trick #2 – Combining Quick Mask & a Soft-edged Brush8 - QuickMask 1Blog

On the left is the original image. On the right, I made a selection using a Quick Mask with a soft-edged brush of just the deeply shadowed area on the right side of the man’s face. Then, I lightened just this selection with a curves adjustment layer. The Soft-edged Brush allows for making the adjustment without creating an unnatural-looking hard line.

Trick #3 – Selecting with Refine Edge & Refine Radius
A couple of lessons in Chapter 1 did provide me with completely new skills. Both lessons covered the Refine Edge dialog box that accompany the Quick Selection tool. This is new in CS5. One of the best things about this dialog box is how it allows for the capturing fuzzy edges such as in the example below:16 - Refine EdgeBlog3Cats

The cat on top left is the original. Note all the little tufts of fur sticking out from the edges of the cat. The image on the top right reflects life before the Refine Edge dialog box – note the unnaturally smooth edge of the selected cat’s rounded back. Prior to Refine Edge, adding in the tufts required selecting each hair – beyond tedious! I selected the bottom cat  using the Refine Edge dialog box’s Refine Radius tool. Note how the wispy bits of fur make this cat look much more like it belongs in the grassy field. Adding a shadow and pulling some of the grass up around the cat’s feet would create more realism, but that would wait for later lessons. Suffice it to say, How To Cheat in Photoshop had my attention. I was impressed to learn such valuable tips even when the lessons seemed to cover only the basics.

Next: Transformation and Distortion

Back to Portfolio Page

Just Thumbing Through

This post was originally published on my previous blog, “Sara Cheats in Photoshop” (click here to visit) on June 26, 2014.

Back to Portfolio Page

When I purchased How to Cheat in Photoshop, I was working full-time but I figured I’d run through it on my spare time. Ha! Who has time when they’re working 40 hours a week?

Lucky for me Caplin had set-up the book so that someone can just flip through the pages and find a technique they’d like to try. So, I tried couple. This one was used as part of a Constant Contact eAnnouncement for my employer. I made it to tell Parade entrants they could now find where their entry was being staged. (See Pixel Perfectionist, Part 2 if you want to know more about the Parade.)

Chalked_Pavement_CC-Banner-New-Blog


The painted on numbers are just regular text that has been run through a displacement map to make them look as if they have been painted on the street. The pavement was turned green  by using a photo filter so it would match the colors of the rest of the announcement.

(Astute readers of my old blog, “Sara Cheats in Photoshop“, will note that the image has changed.  I’ve learned a thing or two about Graphic Design since leaving LGS Recreation in 2013.)

A Healing Touch

The back story for this next series is a bit sad.     On June 27, 2013  I came home from work and found my partner of 19 years dead on the bathroom floor.  His death wasn’t completely unexpected, but it was still quite a shock. I held a memorial service for him in August. His relatives sent me some childhood photos to use in the service.

JeffCommunionBlogSeries

The left photo is the original. Notice the torn top edge and wrinkled right corner. Using the Adobe CS3 techniques I learned several years ago, I tried to patch it using the clone stamp and spot healing brush tools. The middle image is the result. On the right, I cropped the photo and applied the healing brush tool, the latter of which Adobe has vastly improved in CS5.  The healing brush is now a great tool and Caplin has hints to make it even more effective. Had I gone through How to Cheat in Photoshop first, I’d have also used content-aware fill (located under the “Edit” menu) instead of cropping the photo. Regardless, healing the photo had positive affects all around.

Next: What I’ve Learned So Far

Back to Portfolio Page

Pixel Perfectionist – Part II

This post was originally published on my previous blog, “Sara Cheats in Photoshop” (click here to visit) on June 25, 2014

Back to Portfolio Page

As suggested in the previous post, my fortune began to change in mid-2012 when I was hired by Los Gatos-Saratoga Community Education and Recreation (LGS Recreation). It was a temporary assignment to work on the Christmas Parade the organization sponsors every year in early December.  Initially, I was hired for my MS Access expertise (thanks to those Community Ed classes back in ’06)  but my manager soon discovered I was capable of far more than just entering the data from parade entry forms.

Ultimately, my manager leveraged funds in the budget to keep me on past the Parade. By then, there had been turnover at LGS Recreation so I was given the responsibility of creating their Constant Contact e-newsletters.  I was a happy little clam working at LGS Recreation and, more importantly, I decided to purchase some books so I could finally learn some of the new (at least to me) features in CS5.

Let the Cheating Begin
One of the books I purchased was How to Cheat in Photoshop,  6th ed., by Steve Caplin.  I bought the book because the reviews on Amazon said while it wasn’t for someone who had never used Photoshop, it was a great book to learn new techniques for a more advanced user. While I was working at LGS Recreation I did not have time to do more than just thumb through the book and try out a couple of the techniques Caplin writes about.

Alas, my manager (who I loved working for) was unable to squeeze me into the budget for 2014 and my temporary job came to an end after the 2013 Parade. However,  like the Chinese saying, “within every disaster is an opportunity,” I decided to use my time out of work to actually work through the How To Cheat lessons from start to finish.

I highly recommend How to Cheat, as it has really helped me improve my skills. However, the best thing about the book is that Caplin didn’t just publish it and go back to doing freelance work for The Guardian. Instead, to accompany the book, Caplin created an online forum, which he actively manages. If you get stuck on an exercise, you can post a question on the forum and Caplin usually responds within 48 hours, even if one of the other forum members has posted an answer to your question.

New Challenges Lead to a New Title
Caplain also posts what he calls “The Friday Challenge.” These generally consist of a photo that he asks forum members modify in some fashion, such as making a statue come to life. But, Caplain doesn’t give any other instructions, leaving it up to your imagination and creativity to figure out. As forum members finish their versions of the Challenge, they post them to the forum. The following Friday, Caplin posts a critique of each person’s submission.

I have never owned a book where the author stayed so involved and was so willing to communicate with his readers. I have no idea how he finds the time. A forum member offered the suggestion that Caplin has robots handling all his day-to-day minutiae.

Regardless, after a forum participant completes and submits several Challenges, Caplin awards them an appellation that reflects his impression of their work.

And that’s how I came to be known as Pixel Perfectionist

Next: Just Thumbing Through

Back to Portfolio Page

Pixel Perfectionist – Part I

This post was originally published on my previous blog, “Sara Cheats in Photoshop” (click here to visit) on June 25, 2014

Back to Portfolio Page

After the hurricane season of 2005, The American Red Cross began consolidating due to their losses and, by June 2006,  my long-time San Jose,  California.,  job was “centralized” to Pamona, California. As I needed a new position, I worked at a part-time temporary job while looking for something permanent. During that period I discovered  my mainstream computer skills were rather rusty.

First Encounter: Photoshop 7
By the spring of 2007 I decided to enroll in the self-paced Santa Clara Unified School District Adult Education program called Computer Office Specialist. After completing the entire Microsoft Office Suite (including Access) early, I decided to learn Adobe Photoshop.

I did so well with both the Beginning and Advanced Photoshop 7 courses that the Instructor pulled me aside and told me that Adobe Illustrator 10 was still available on the center’s computers.  Although she was unfamiliar with Illustrator, she said I was welcome to run through the lessons in the book.  I quickly completed all the lessons and, shortly thereafter, I landed a job at the Blood Centers of the Pacific (BCP) in November 2007.

I obtained a copy of Illustrator 10 and I also purchased a book on the software by Friends of Ed.  (The book has an entire chapter on the Pen Tool with ten lessons.  If you are having trouble using this tool, I highly recommend the book.)  I thought I might never use Photoshop again, particularly because there was little call for it at my new BCP job.

Second Encounter: CS3
The economic collapse of 2008/2009 caused a steady reduction in my hours at BCP and ultimately resulted in being laid-off in June of 2010.  This time, I decided to avail myself of some of state job retraining funding to gain “Second Act” career skills. I enrolled in a formal web design program, which included a course in Photoshop CS3.

Sadly, the economy had not recovered when I completed the Web design program.  For 2011 and about half of 2012 I completed freelance Web and graphics design projects as well as holding a series of temporary positions, only some of which utilized my new Web and graphic design skills.

Fortunately, things were about to pick up.

Next: Pixel Perfectionist Part 2

Back to Portfolio Page

What I Have Learned So Far

This blog post chronicles my progress learning new Photoshop skills from the book How to Cheat in Photoshop, 6th ed., by Steve Caplin, and my Friday Challenge submissions to the Forum linked to the book.

Back to Portfolio Page

Having just completed chapter 8 in How to Cheat in Photoshop, 6th ed., by Steve Caplin, I can say the most important lesson I’ve learned is that the devil truly is in the details. To make a convincing photo montage its all about matching levels, shadows, including the fuzzy bits, reflections, etc. Here are three images to illustrate.

#1 – The original from one of my CS3 exercises in 2010:

HouseOriginalBlog


This image is, by the way, very reminiscent of something Caplin would offer as a “Friday Challenge” exercise, only he wouldn’t have provided any other instructions other than to embellish the house as you saw fit.

#2 – A completed assignment I submitted for my CS3 course in 2010


I received an A+ on this assignment because I used all of the techniques as instructed. However, if I submitted this for a “Friday Challenge” exercise, Caplin would probably give me a very poor review and possibly take away my title, Pixel Perfectionist.

#3 – A revised version showcasing how to “Cheat:

HouseCS5Blog

Using my newly developed Photoshop skills, I followed the instructions as to placement and sizing of the other elements that were in the CS3 lesson. I did add a new sky and a fence. Note that even though I was using CS5 to recreate this image, all of the techniques I used to create this version were available in CS3.

Cheating rocks.

Next: Natural Selection
Back to Portfolio Page