Just Thumbing Through

This post was originally published on my previous blog, “Sara Cheats in Photoshop” (click here to visit) on June 26, 2014.

Back to Portfolio Page

When I purchased How to Cheat in Photoshop, I was working full-time but I figured I’d run through it on my spare time. Ha! Who has time when they’re working 40 hours a week?

Lucky for me Caplin had set-up the book so that someone can just flip through the pages and find a technique they’d like to try. So, I tried couple. This one was used as part of a Constant Contact eAnnouncement for my employer. I made it to tell Parade entrants they could now find where their entry was being staged. (See Pixel Perfectionist, Part 2 if you want to know more about the Parade.)

Chalked_Pavement_CC-Banner-New-Blog


The painted on numbers are just regular text that has been run through a displacement map to make them look as if they have been painted on the street. The pavement was turned green  by using a photo filter so it would match the colors of the rest of the announcement.

(Astute readers of my old blog, “Sara Cheats in Photoshop“, will note that the image has changed.  I’ve learned a thing or two about Graphic Design since leaving LGS Recreation in 2013.)

A Healing Touch

The back story for this next series is a bit sad.     On June 27, 2013  I came home from work and found my partner of 19 years dead on the bathroom floor.  His death wasn’t completely unexpected, but it was still quite a shock. I held a memorial service for him in August. His relatives sent me some childhood photos to use in the service.

JeffCommunionBlogSeries

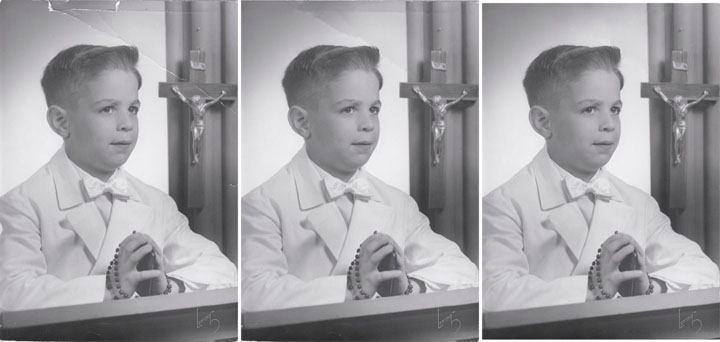
The left photo is the original. Notice the torn top edge and wrinkled right corner. Using the Adobe CS3 techniques I learned several years ago, I tried to patch it using the clone stamp and spot healing brush tools. The middle image is the result. On the right, I cropped the photo and applied the healing brush tool, the latter of which Adobe has vastly improved in CS5.  The healing brush is now a great tool and Caplin has hints to make it even more effective. Had I gone through How to Cheat in Photoshop first, I’d have also used content-aware fill (located under the “Edit” menu) instead of cropping the photo. Regardless, healing the photo had positive affects all around.

Next: What I’ve Learned So Far

Back to Portfolio Page

Pixel Perfectionist – Part II

This post was originally published on my previous blog, “Sara Cheats in Photoshop” (click here to visit) on June 25, 2014

Back to Portfolio Page

As suggested in the previous post, my fortune began to change in mid-2012 when I was hired by Los Gatos-Saratoga Community Education and Recreation (LGS Recreation). It was a temporary assignment to work on the Christmas Parade the organization sponsors every year in early December.  Initially, I was hired for my MS Access expertise (thanks to those Community Ed classes back in ’06)  but my manager soon discovered I was capable of far more than just entering the data from parade entry forms.

Ultimately, my manager leveraged funds in the budget to keep me on past the Parade. By then, there had been turnover at LGS Recreation so I was given the responsibility of creating their Constant Contact e-newsletters.  I was a happy little clam working at LGS Recreation and, more importantly, I decided to purchase some books so I could finally learn some of the new (at least to me) features in CS5.

Let the Cheating Begin
One of the books I purchased was How to Cheat in Photoshop,  6th ed., by Steve Caplin.  I bought the book because the reviews on Amazon said while it wasn’t for someone who had never used Photoshop, it was a great book to learn new techniques for a more advanced user. While I was working at LGS Recreation I did not have time to do more than just thumb through the book and try out a couple of the techniques Caplin writes about.

Alas, my manager (who I loved working for) was unable to squeeze me into the budget for 2014 and my temporary job came to an end after the 2013 Parade. However,  like the Chinese saying, “within every disaster is an opportunity,” I decided to use my time out of work to actually work through the How To Cheat lessons from start to finish.

I highly recommend How to Cheat, as it has really helped me improve my skills. However, the best thing about the book is that Caplin didn’t just publish it and go back to doing freelance work for The Guardian. Instead, to accompany the book, Caplin created an online forum, which he actively manages. If you get stuck on an exercise, you can post a question on the forum and Caplin usually responds within 48 hours, even if one of the other forum members has posted an answer to your question.

New Challenges Lead to a New Title
Caplain also posts what he calls “The Friday Challenge.” These generally consist of a photo that he asks forum members modify in some fashion, such as making a statue come to life. But, Caplain doesn’t give any other instructions, leaving it up to your imagination and creativity to figure out. As forum members finish their versions of the Challenge, they post them to the forum. The following Friday, Caplin posts a critique of each person’s submission.

I have never owned a book where the author stayed so involved and was so willing to communicate with his readers. I have no idea how he finds the time. A forum member offered the suggestion that Caplin has robots handling all his day-to-day minutiae.

Regardless, after a forum participant completes and submits several Challenges, Caplin awards them an appellation that reflects his impression of their work.

And that’s how I came to be known as Pixel Perfectionist

Next: Just Thumbing Through

Back to Portfolio Page

Pixel Perfectionist – Part I

This post was originally published on my previous blog, “Sara Cheats in Photoshop” (click here to visit) on June 25, 2014

Back to Portfolio Page

After the hurricane season of 2005, The American Red Cross began consolidating due to their losses and, by June 2006,  my long-time San Jose,  California.,  job was “centralized” to Pamona, California. As I needed a new position, I worked at a part-time temporary job while looking for something permanent. During that period I discovered  my mainstream computer skills were rather rusty.

First Encounter: Photoshop 7
By the spring of 2007 I decided to enroll in the self-paced Santa Clara Unified School District Adult Education program called Computer Office Specialist. After completing the entire Microsoft Office Suite (including Access) early, I decided to learn Adobe Photoshop.

I did so well with both the Beginning and Advanced Photoshop 7 courses that the Instructor pulled me aside and told me that Adobe Illustrator 10 was still available on the center’s computers.  Although she was unfamiliar with Illustrator, she said I was welcome to run through the lessons in the book.  I quickly completed all the lessons and, shortly thereafter, I landed a job at the Blood Centers of the Pacific (BCP) in November 2007.

I obtained a copy of Illustrator 10 and I also purchased a book on the software by Friends of Ed.  (The book has an entire chapter on the Pen Tool with ten lessons.  If you are having trouble using this tool, I highly recommend the book.)  I thought I might never use Photoshop again, particularly because there was little call for it at my new BCP job.

Second Encounter: CS3
The economic collapse of 2008/2009 caused a steady reduction in my hours at BCP and ultimately resulted in being laid-off in June of 2010.  This time, I decided to avail myself of some of state job retraining funding to gain “Second Act” career skills. I enrolled in a formal web design program, which included a course in Photoshop CS3.

Sadly, the economy had not recovered when I completed the Web design program.  For 2011 and about half of 2012 I completed freelance Web and graphics design projects as well as holding a series of temporary positions, only some of which utilized my new Web and graphic design skills.

Fortunately, things were about to pick up.

Next: Pixel Perfectionist Part 2

Back to Portfolio Page

What I Have Learned So Far

This blog post chronicles my progress learning new Photoshop skills from the book How to Cheat in Photoshop, 6th ed., by Steve Caplin, and my Friday Challenge submissions to the Forum linked to the book.

Back to Portfolio Page

Having just completed chapter 8 in How to Cheat in Photoshop, 6th ed., by Steve Caplin, I can say the most important lesson I’ve learned is that the devil truly is in the details. To make a convincing photo montage its all about matching levels, shadows, including the fuzzy bits, reflections, etc. Here are three images to illustrate.

#1 – The original from one of my CS3 exercises in 2010:

HouseOriginalBlog


This image is, by the way, very reminiscent of something Caplin would offer as a “Friday Challenge” exercise, only he wouldn’t have provided any other instructions other than to embellish the house as you saw fit.

#2 – A completed assignment I submitted for my CS3 course in 2010


I received an A+ on this assignment because I used all of the techniques as instructed. However, if I submitted this for a “Friday Challenge” exercise, Caplin would probably give me a very poor review and possibly take away my title, Pixel Perfectionist.

#3 – A revised version showcasing how to “Cheat:

HouseCS5Blog

Using my newly developed Photoshop skills, I followed the instructions as to placement and sizing of the other elements that were in the CS3 lesson. I did add a new sky and a fence. Note that even though I was using CS5 to recreate this image, all of the techniques I used to create this version were available in CS3.

Cheating rocks.

Next: Natural Selection
Back to Portfolio Page