This blog post chronicles my progress learning new Photoshop skills from the book How to Cheat in Photoshop, 6th ed., by Steve Caplin, and my Friday Challenge submissions to the Forum linked to the book.
As explained in my post Pixel Perfectionist – Part 2“, I intended to dig into How to Cheat in Photoshop, 6th ed., by Steve Caplin when my temporary job at LGS Recreation ended December 2013. However, I didn’t get down to business until mid-January 2014. Sure, I had excuses like the Holidays and then a bought of Swine Flu. But my real reluctance was due to the first chapter covering selection techniques. After all, making selections is SO basic. I began to question all the great reviews I’d read before I bought the book. Was I wrong! When I finally did buckle down, I discovered that How To Cheat in Photoshop offered a wealth of little tricks in every lesson. Here are three from Chapter 1.
Trick #1 – Black vs. Grey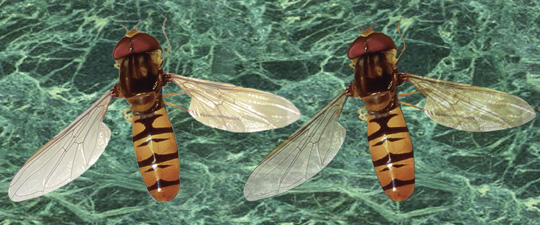
Both of these flies were selected and copied from a plain white background using my favorite selection technique: Quick Mask. On the left, I selected the fly using a traditional black, hard-edged brush. On the right, I also used a black, hard-edged brush for the fly’s body, but the transparent wings were created by using a 60% grey brush, hard-edged, except for the veins in the wings. They were still selected using the black brush. Clearly, the right-hand fly looks much more realistic against the background. This technique was available way back in Photoshop 7, but neither of the books I learned from for Photoshop 7 or CS3 mentioned this trick.
Trick #2 – Combining Quick Mask & a Soft-edged Brush
On the left is the original image. On the right, I made a selection using a Quick Mask with a soft-edged brush of just the deeply shadowed area on the right side of the man’s face. Then, I lightened just this selection with a curves adjustment layer. The Soft-edged Brush allows for making the adjustment without creating an unnatural-looking hard line.
Trick #3 – Selecting with Refine Edge & Refine Radius
A couple of lessons in Chapter 1 did provide me with completely new skills. Both lessons covered the Refine Edge dialog box that accompany the Quick Selection tool. This is new in CS5. One of the best things about this dialog box is how it allows for the capturing fuzzy edges such as in the example below: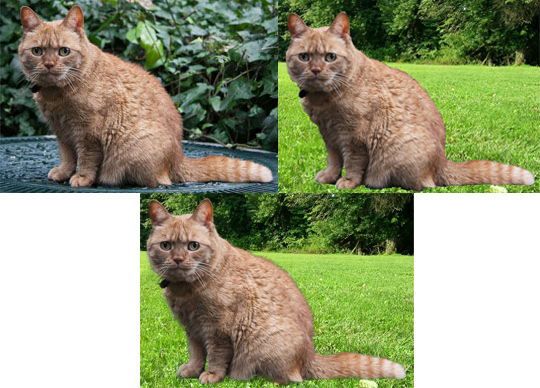
The cat on top left is the original. Note all the little tufts of fur sticking out from the edges of the cat. The image on the top right reflects life before the Refine Edge dialog box – note the unnaturally smooth edge of the selected cat’s rounded back. Prior to Refine Edge, adding in the tufts required selecting each hair – beyond tedious! I selected the bottom cat using the Refine Edge dialog box’s Refine Radius tool. Note how the wispy bits of fur make this cat look much more like it belongs in the grassy field. Adding a shadow and pulling some of the grass up around the cat’s feet would create more realism, but that would wait for later lessons. Suffice it to say, How To Cheat in Photoshop had my attention. I was impressed to learn such valuable tips even when the lessons seemed to cover only the basics.
Next: Transformation and Distortion